A powerful and seamless data indexing solution is the bedrock of any blockchain—be it L1/L2 public blockchains, rollups, or appchains. Our focus for this article will be the use-case-specific appchains. By use-case-specific, we mean a permissioned enterprise appchain that caters to a single use case, such as DeFi. Plus, the chain is open to only authorized participants, and it will need to retrieve large amounts of data from various sources.
If you are building such an appchain or you already manage one, Traceye’s dedicated indexer solution is engineered for you. Let’s dive deeper and learn about the comprehensive offerings of dedicated indexers for use case-specific appchains.
Who really needs Traceye’s Dedicated Indexer for AppChains?
Dedicated indexer is one of the Traceye’s subgraph services through which applications get their very own dedicated indexer or graph node optimized for high-availability, superior scaling, and unparalleled security. Dedicated indexer is mainly useful for the following type of enterprises:
Category: 1 Enterprise clients seeking blazing fast response to data queries, rapid synching, and exclusive utilization of their subgraph. For example, a company launches a gaming-focused permissionless appchain and it encourages gamers communities to deploy their smart contract and support the chain’s growth.
Category: 2 Web3 projects or enterprises launching a subgraph for their use-case specific, unique permissioned appchain. This type of new appchains are generally not supported on shared hosting, and that’s where a dedicated node helps. Also, the motive behind launching a dedicated subgraph can be extremely high throughput requirement, ease of query customization, and adding interoperability with some main chains. A good example is Kunji Finance, which has launched and is managing a subgraph crafted as per their distinct project needs.
Fow now, let’s focus on the second category. We will basically explore all the Traceye’s dedicated indexer offerings for use-case specific appchains and learn about the core benefits.
How does Traceye’s dedicated indexer supercharges data indexing in use-case specific appchains?
Traceye’s dedicated indexer for use-case specific appchains comes with a bunch of features and service add-ons that streamline the whole data indexing process while eliminating the heavy lifting. All of these offerings are explained one-by-one below:
1. No-hassle, one-click subgraph launch:
Traceye adds an abstraction layer over the complex, programming-based approach of launching a dedicated indexer. Within a few clicks, you can deploy your own custom subgraph. All you need to do is– buy a subscription for the graph node, add basic & chain-level details, pick add-on services, and deploy. Once your node is up and running, you can start fetching data from it. Check out this step-by-step process for a clear understanding.
2. Advanced developer suite.
A comprehensive developer suite is offered on Traceye that you can leverage as ‘addon’ services on top of your dedicated graph node. Let’s understand how these addons are beneficial for use-case specific appchains:
- Webhooks:
The webhooks feature in Traceye is created to support real-time data streaming. As you may already know, a shared subgraph or dedicated indexer is created to fetch data that is stored in ledger databases. Therefore, webhooks enable use-case specific appchains to fetch live data for their specific entities. The pain point here is that if you enable webhooks in subgraphs on your own, it will require you to set up and manage a different infrastructure alongside your subgraphs. Knowing this, Traceye has consolidated the webhook addon within the dedicated indexer offering so that you can get real-time data and ledger data simultaneously without needing to manage additional infra or hardware resources. Below are the two ways to enable webhooks in your graph node:
>During graph node deployment: The 3rd step of graph node deployment is dedicated for addon services (as you can see in the screenshot). It allows you to choose to enable webhook as well as other services.

>After your node is live: Go to your live graph node where you wish to enable webhooks. Then, navigate to webhooks and click the enable button to finish.

- Ledger Metadata Data and Index Data pruning:
Graph nodes and subgraphs work by storing data block-wise in the database. Data consumers sometimes do not simply need historical data; instead, they want only data for their desired latest blocks and want the rest of the data to be pruned automatically so that database management is more efficient. The data are very specific to the requirement.
Ledger meta data pruning and index meta data pruning allows users to prune data older than a certain block count. The main difference here is that ledger data pruning is designed to prune data from a chain’s metadata while index data pruning is configured on subgraphs with integrated cron to remove unuseful metadata from databases.
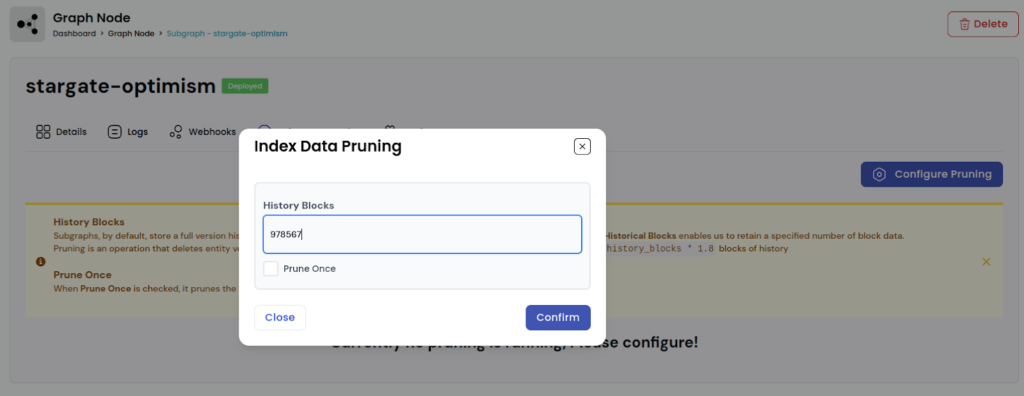
To activate index metadata pruning, navigate to deployed subgraphs and click ‘configure’. Now, enter the block count for which you want to retain data. For example, we have added 978576 in history blocks. Tick ‘Prune once’ if you want to delete data just once. Or, click ‘continue’ without checking for automatic pruning of blocks whenever ‘history_blocks*1.8’ blocks are collected.
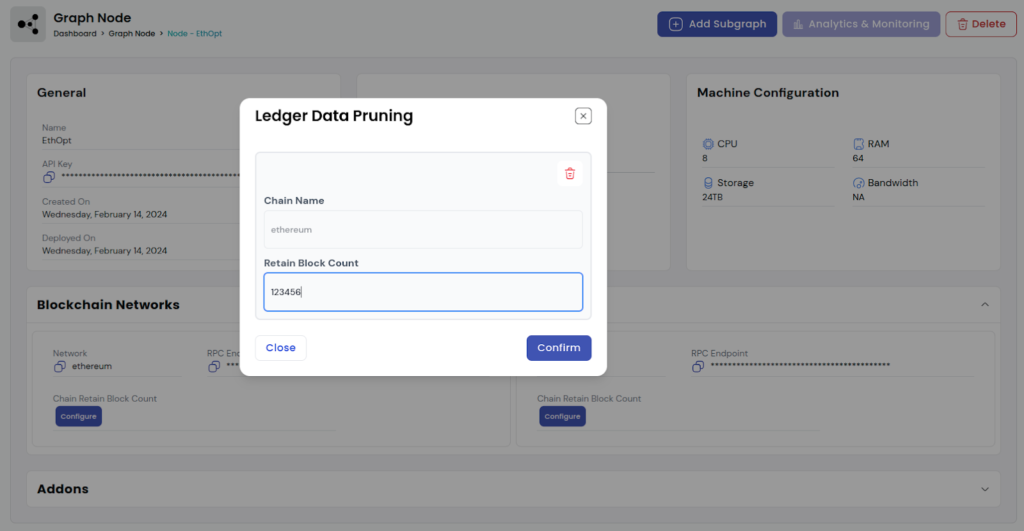
For activation of Ledger data pruning, go to the live graph node and click ‘configure’ under the blockchain networks. Type in the network name and add your preferred block count to retain. Click confirm to activate.
Note: You first need to buy data pruning add ons while subgraph deployment.
- Analytics & BI Engine:
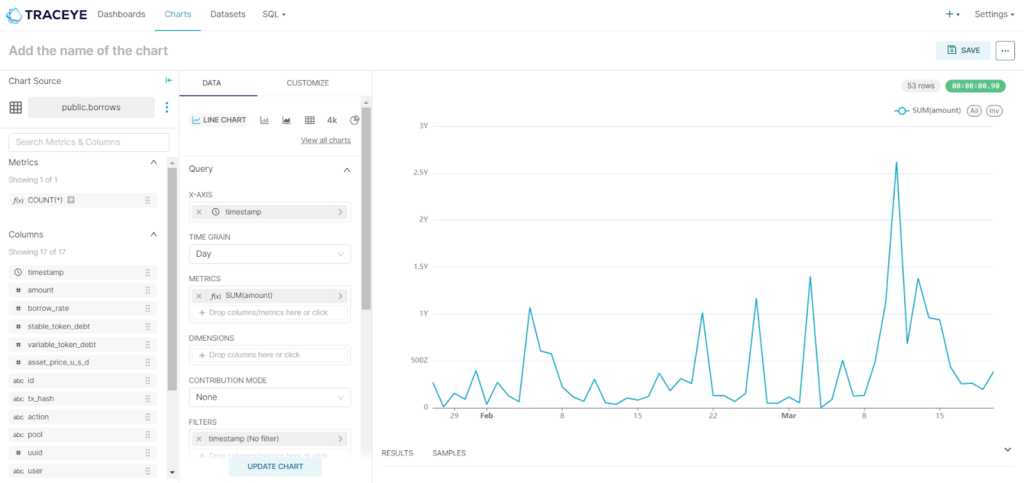
The analytics & BI engine tool in Traceye is another no-code analytics and visualization tool through which users can make subgraph’s indexed data easy-to-analyze via charts, graphs, or tables. For example, if you have deployed a DeFi subgraph for a loan platform, its DB will index bulks of data. Now if you want to get data like borrow, repay, or supply from the database, it can be a complex process. However, with the analytics & BI engine, you can create tables for the specific data and see analytics on a comprehensive dashboard offering ease of access. Let’s quickly create a ‘Borrow’ table using Traceye’s BI & analytics tool:
1. Go to your live graph node and click the three dots menu in the top-right corner and click Traceye BI.
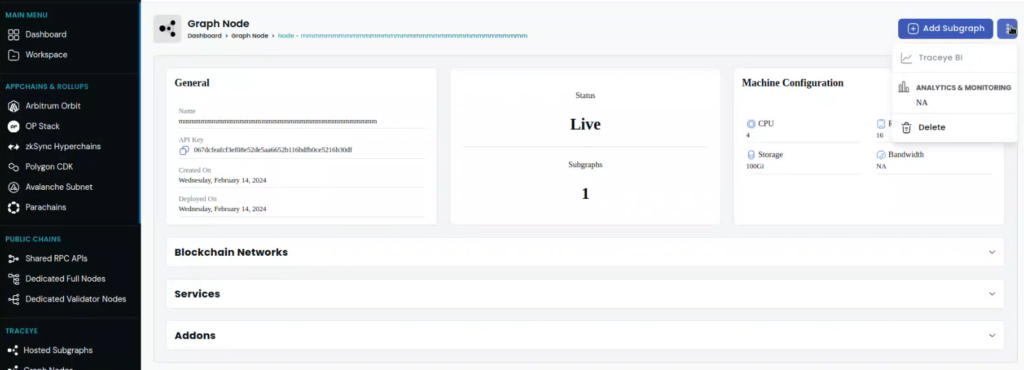
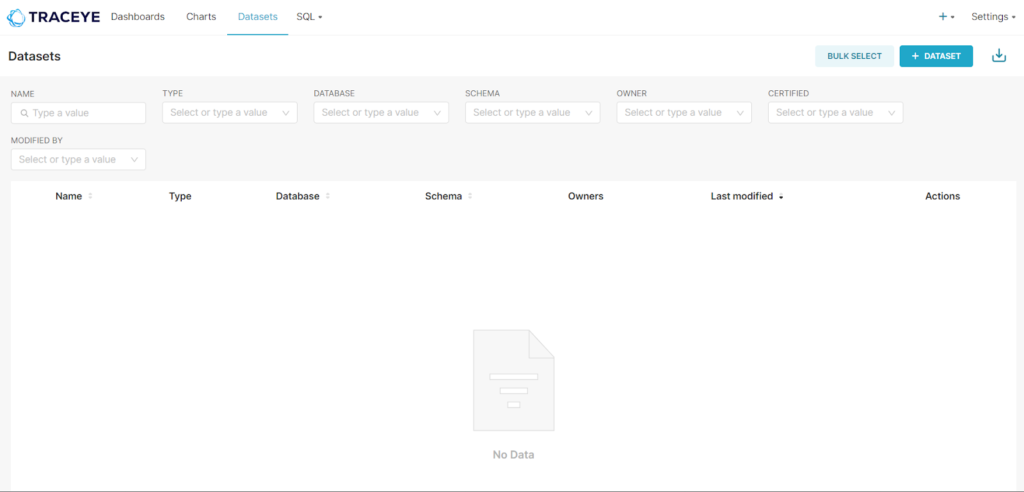
2. A separate dashboard will open. Navigate to the Datasets menu and click on the ‘+Dataset’ button.
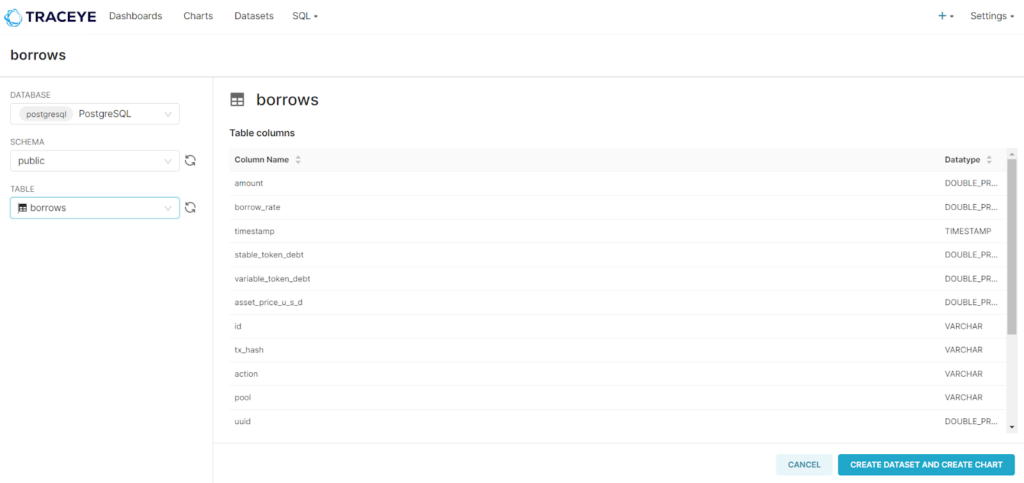
3. Choose elements for your table. For example- we are creating a table to see all the borrows in a DeFi loan platform. Hence, we have selected ‘borrows’ in the table, the database is postgreSQL (default), and the schema is public. Continue with creating the dataset.
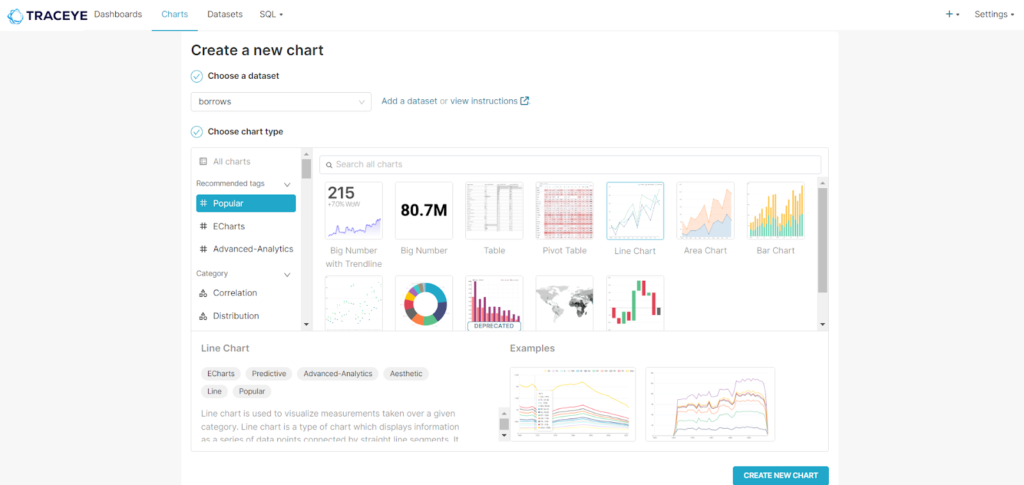
4. Pick your preferred chart type- line chat, bar chart, pivot table, etc. Let’s choose a line chart. Proceed with the ‘create new chart’ button.
5. Provide additional details like query (ex-timestamp), time grain (ex-day), and metrics (ex- sum). Based on our inputs, we will be getting a chart that will show the sum of the borrowed amount per day.
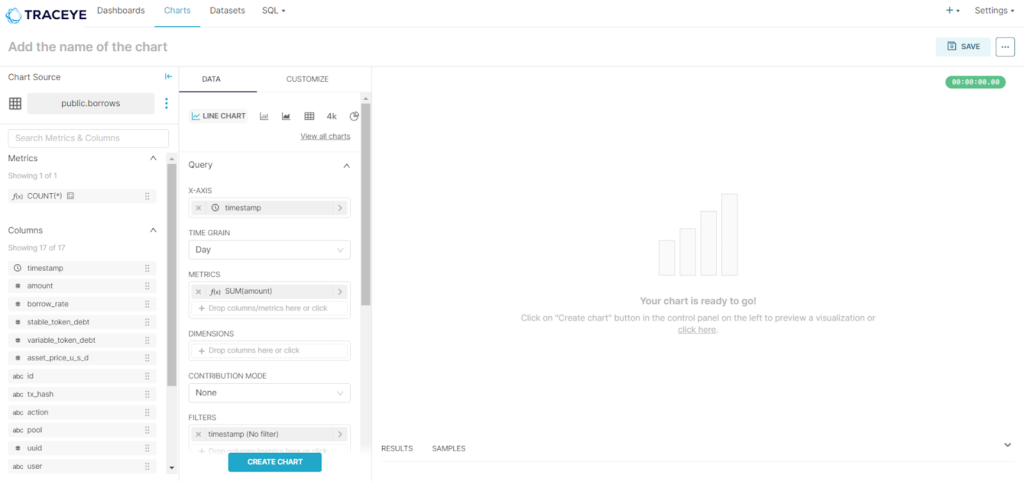
6. Click ‘Create Chart’ and the analytics table will appear instantly. As required, you can edit or update the table.
- Direct Database access and custom entities:
Direct DB access and custom entities are Traceye’s most recent additions which will function independently to streamline the dedicated indexer performance and optimize its usability.
Here, Direct database refers to the indexed databases from which dedicated indexers or subgraphs fetch data. The direct DB access addon at Traceye allows enterprises to access data directly from the database by integrating elastic or custom search rather than running GraphQL queries or webhooks.
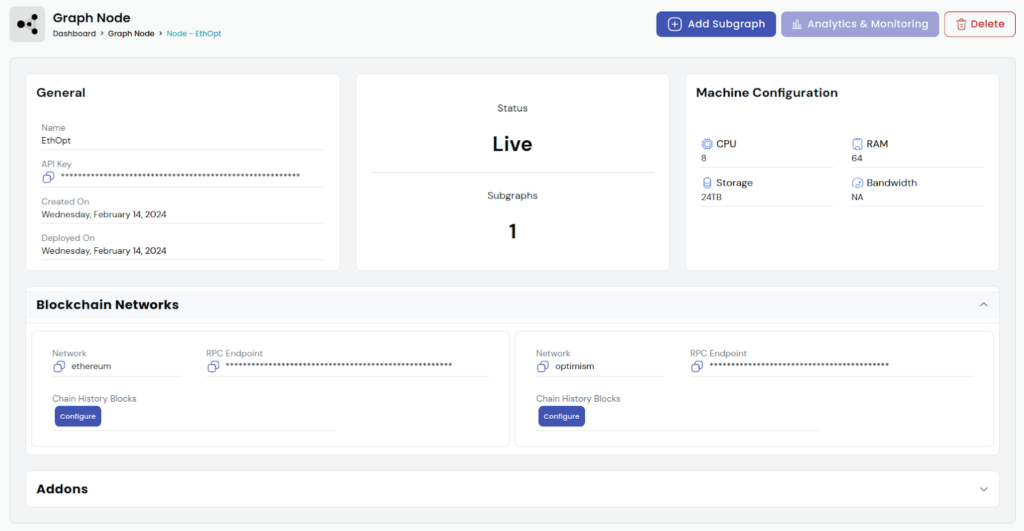
Regarding custom entities, it is designed to enhance the data indexing capabilities of dedicated indexers by allowing users to combine subgraph data with data from external sources and provide them together for a holistic view. For example, you can use graph nodes to configure multiple networks like Ethereum, Avalanche, Optimism and get their data. Then, you can set up a business logic with a subgraph schema that includes a custom entities table so that you can get a combination of subgraph data plus off-chain data (like DEX data) without the need of managing additional servers. The graph node’s server itself will handle all these data requirements without creating hassle.
3. Configure multiple networks:
A dedicated graph node gives you the flexibility to seamlessly configure multiple networks on the single server and manage them on a unified dashboard. Regarding use-case specific appchains, Traceye currently supports Avalanche Subnets, Hyperledger Besu, Cosmos SDK, OP Stack, Polygon CDK, Substrate Parachains, and zkSync Hyperchains.
4. Dedicated infrastructure management:
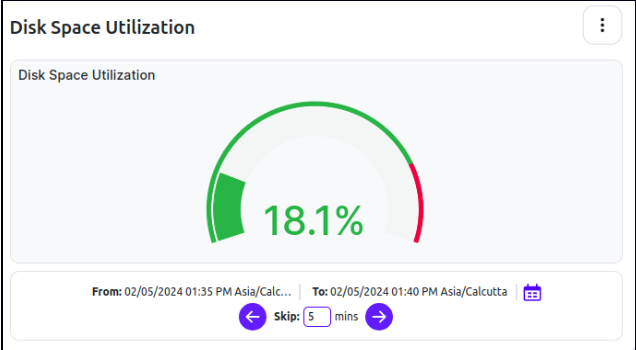
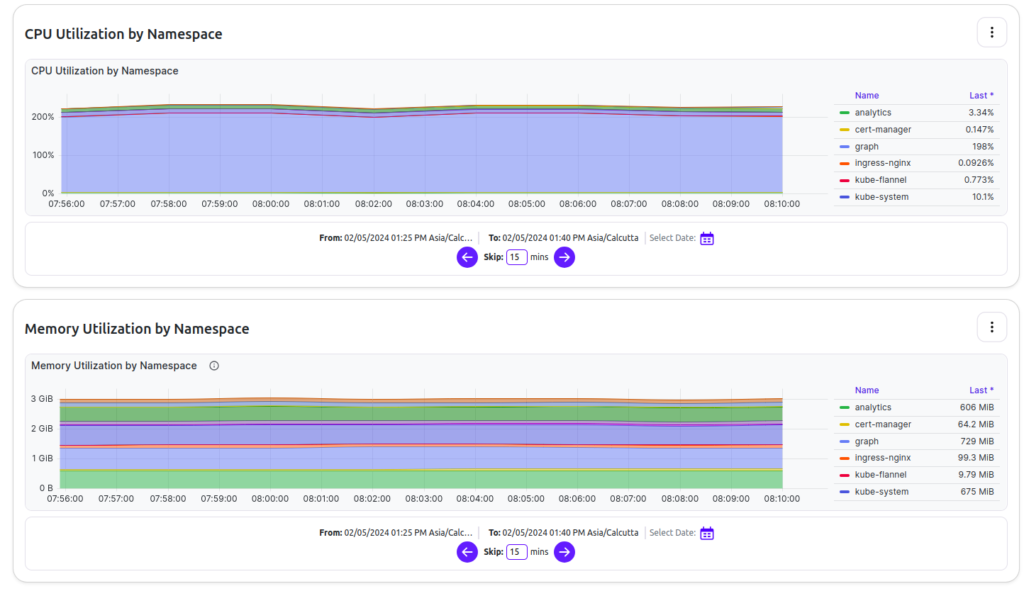
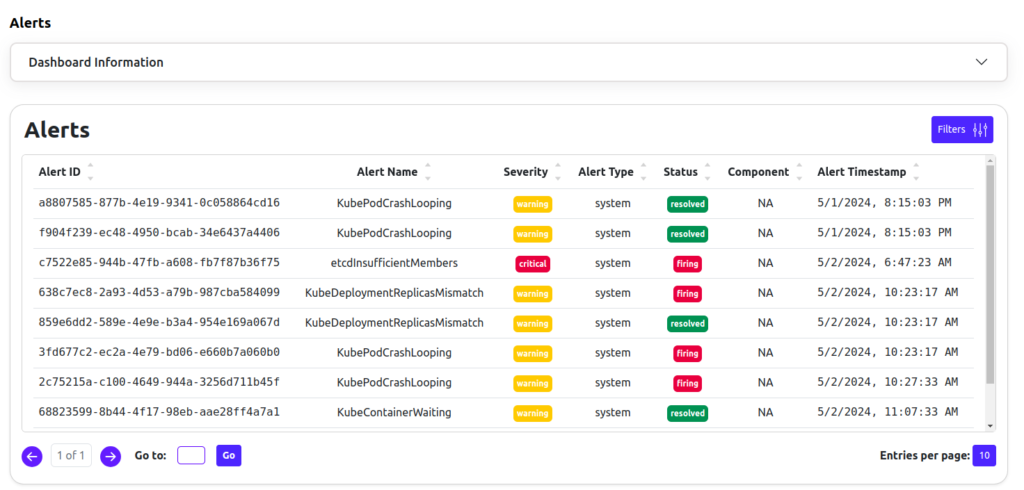
Traceye offers dedicated infrastructure management for your graph nodes, including 24/7 rigorous monitoring & analytics to ensure reliable performance of nodes as well as subgraphs deployed on it. Traceye has an extensive developer team to keep a track of your indexer, detect issues, and provide quick resolution.
For example, Traceye constantly monitors the resource consumption of your node, such as disk consumption, CPU utilization, and memory usage. Whenever the consumption goes above an alarming situation, real-time alerts are produced. Developers at Traceye see these alerts and bypass the issues instantly, eliminating any performance issues.
More reasons to choose Traceye’s dedicated for your use-case specific appchains:
- Ultrafast data indexing: Indexing on dedicated indexers happens at a lightning speed since the infrastructure remains dedicated for a single application. Because of this, indexers backfill the data again at 5X speed, which makes a great impact on improving application’s performance and user experience.
- Reduced data lag: With blazing fast data indexing and backfilling, Traceye’s dedicated indexer for use-case specific appchains reduced data lag by more than 50%.
- Chain Re-orgs synced automatically: No more juggling with data synching or re-orgs. Traceye does all these automatically in the backend, allowing you to get streamlined, fast access to data.
- High Availability with 99.99% uptime: With 24/7 monitoring and enterprise SLAs, all your subgraphs get a boost of 99.99% uptime.
- No cost explosion: Though dedicated indexers are costlier than shared subgraphs, the cost does not explode over the time. Hence, you get stability in cost.
Ready to launch your dedicated indexer?
We’ve covered the comprehensive features of Traceye’s dedicated indexer for use-case specific appchains. If these go well with your data indexing requirements, connect with us to launch your own dedicated graph node. Also, the experts at Traceye are open to discuss your unique requirements for custom indexing solutions. For that, you can either send us an email or schedule a one-to-one call to discuss in detail.

Product Director & an intrapreneur with a focus on intersection of technology and business models. Having 10+ years of experience in consulting, software design & architecture, product and project management. Career track follows working on ERPs, Consumer & Enterprise products, stints in AI & Machine Learning and finally settling in decentralization & Blockchain space.
